📌 Who This Article Is For
- Developers and QA engineers interested in browser automation with Selenium
- Anyone who wants to automate member registration and form input workflows
- Engineers looking to implement E2E tests covering login and logout flows
- Those who want to automate screenshot capture and log management
✅ What You Will Learn
- How to automate multi-page form operations using Selenium
- How to write flexible element locators with XPath
- Practical implementation of log output and screenshot management
- How to build a complete E2E flow: registration → logout → login
👨💻 About This Article
This article is written by a QA engineer with hands-on experience in test automation.
All source code has been verified to work and is publicly available on GitHub
(automated-testing-portfolio).
Every technique shared here comes from real-world automation work.
“I’m tired of filling out registration forms manually every single time…” — Sound familiar?
In this article, we’ll walk through a script built with Python × Selenium that fully automates
the Yodobashi Camera member registration form — from form input and submission all the way to login verification.
We’ll cover robust element detection using multiple XPath patterns, debug-friendly logging and screenshots,
and the QA automation design philosophy you can apply to real projects right away.
🎯 Purpose of This Test: To verify end-to-end that a user can successfully complete member registration. This goes beyond just confirming the registration itself — it also validates that the user can log in and log out afterward.
- Test Perspectives
- What This Script Can Do
- Full Automation Flow
- Full Source Code
- Method Breakdown
- ① __init__() — Class Initialization & ChromeDriver Setup
- ② log() / take_screenshot() — Logging & Evidence Collection
- ③ fill_basic_info() — Name & Furigana Input
- ④ fill_address() — Postal Code Search & Address Input
- ⑤ fill_contact_info() — Phone, Date of Birth & Email
- ⑥ accept_terms() — Terms of Service Checkbox
- ⑦ click_next_button() / click_confirm_button() — Screen Transition Buttons
- ⑧ login() / logout() — Login Verification & Cleanup
- ⑨ reset_password() — Password Reset Flow
- Sample Execution Log
- Ideas for Taking It Further
- Use Cases & Extensions
- Applying This to Real Projects: POM × CI/CD
- Pitfalls & Lessons Learned
- Summary
Test Perspectives
This script covers the following test perspectives. As a QA engineer, clearly defining “what this test is guaranteeing” is essential in real-world projects.
| Perspective | Description | How This Script Covers It |
|---|---|---|
| ✅ Happy Path | Successful registration and login | End-to-end: registration → logout → login verified in one flow |
| ⚠️ Empty Input | Error display when required fields are left blank | Log output + screenshot saved on step failure |
| ⚠️ Invalid Email | Input without “@” or missing domain | Swap test data to run negative path scenarios |
| ⚠️ Invalid Password | Too short or disallowed characters | Change fill_password() parameter to verify |
| 🔁 Duplicate Registration | Attempting to register with an already-used email | Re-run using the same email value to verify behavior |
What This Script Can Do
A single class handles the full flow from registration to logout to login — a complete, self-contained automation.
📝
Automated Form Input
Fills in name, furigana, address, phone, date of birth, and email automatically
📮
Postal Code → Address Lookup
Enters postal code, clicks “Search Address”, and selects from the results
✅
Terms Agreement Checkbox
Handles click, state verification, and JS fallback for checkbox interaction
🔐
Password Input (Confirmation Screen)
Automatically fills in password and confirmation password on the review screen
📸
Auto Screenshot Saving
Saves PNG screenshots at each step for visual verification during debugging
📋
Log File Output
Saves timestamped logs to a text file, making execution history fully traceable
Full Automation Flow
The signup_complete() method orchestrates all steps. Each step is an independent method — easy to debug and reuse.
| Step | Action | Method | Screenshot |
|---|---|---|---|
| 1 | Navigate to registration page from top page | navigate_to_register_page() |
01_registration_page.png |
| 2 | Fill in name and furigana | fill_basic_info() |
— |
| 3 | Fill in postal code and address | fill_address() |
— |
| 4 | Fill in phone, date of birth, email | fill_contact_info() |
— |
| 5 | Agree to terms of service | accept_terms() |
02_form_filled.png |
| 6 | Click “Next” (input → confirmation screen) | click_next_button() |
03_confirmation_page.png |
| 7 | Enter password on confirmation screen | fill_password() |
04_password_filled.png |
| 8 | Click “Register” (confirmation → completion) | click_confirm_button() |
05_registration_complete.png |
| 9 | Logout | logout() |
06_after_logout.png |
| 10 | Login with registered account | login() |
07_after_login.png |
| 11 | Second logout | logout() |
08_after_second_logout.png |
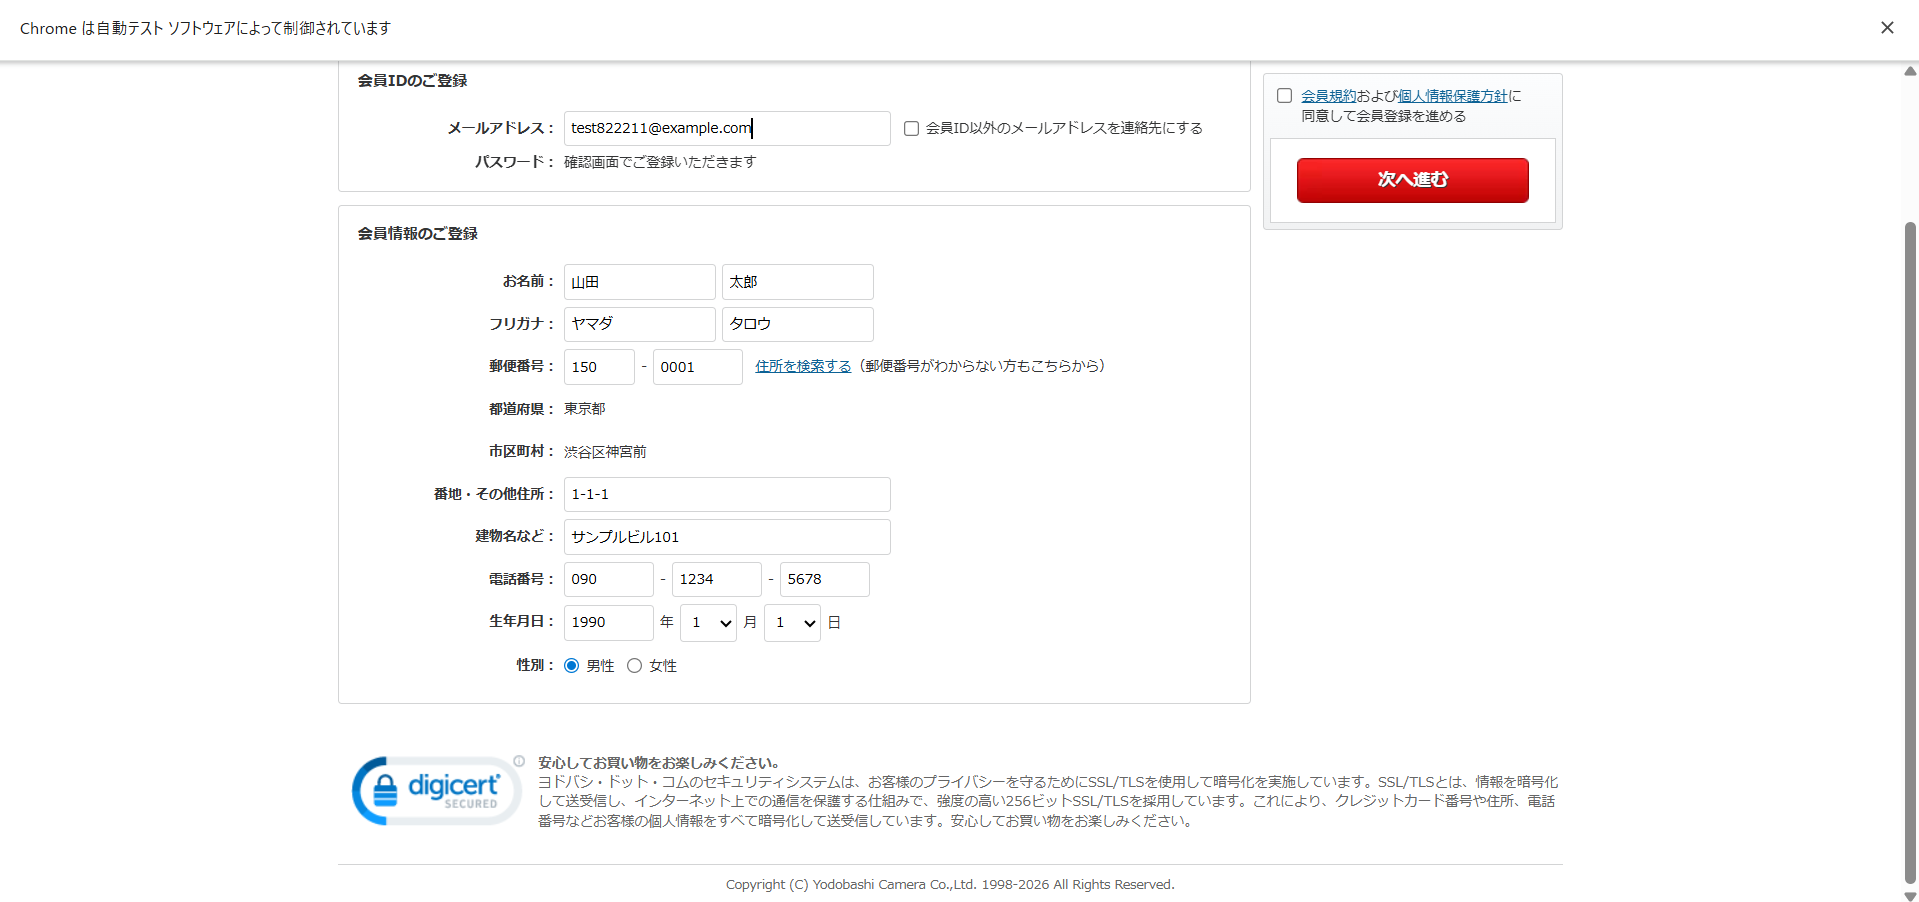
Here’s what it looks like when the script runs — all fields filled in automatically with the test data dictionary. Swapping to different test data is as simple as editing one Python dict.

▲ The registration form after Selenium automation runs — all fields correctly populated with the test data
Full Source Code
from selenium import webdriver
from selenium.webdriver.common.by import By
from selenium.webdriver.support.ui import WebDriverWait
from selenium.webdriver.support import expected_conditions as EC
from selenium.webdriver.support.ui import Select
from datetime import datetime
import os
import time

class YodobashiAutoSignup:
    def __init__(self, headless=False):
        self.top_url = "https://www.yodobashi.com/"
        self.register_url = "https://order.yodobashi.com/yc/member/register/index.html"
        options = webdriver.ChromeOptions()
        options.add_argument('--disable-blink-features=AutomationControlled')
        if not headless:
            options.add_argument('--start-maximized')
        else:
            options.add_argument('--headless')
        options.add_argument('--disable-popup-blocking')
        self.driver = webdriver.Chrome(options=options)
        self.wait = WebDriverWait(self.driver, 15)
        self.log_folder = os.path.join(
            os.path.expanduser("~"), "Desktop", "yodobashi_signup_logs"
        )
        self.setup_log_folder()
        self.log_file = os.path.join(
            self.log_folder,
            f"signup_log_{datetime.now().strftime('%Y%m%d_%H%M%S')}.txt"
        )

    def setup_log_folder(self):
        if not os.path.exists(self.log_folder):
            os.makedirs(self.log_folder)

    def log(self, message):
        timestamp = datetime.now().strftime('%Y-%m-%d %H:%M:%S')
        log_message = f"[{timestamp}] {message}"
        print(log_message)
        with open(self.log_file, 'a', encoding='utf-8') as f:
            f.write(log_message + '\n')

    def take_screenshot(self, name):
        screenshot_name = name.replace('(', '_').replace(')', '').replace(' ', '_')
        screenshot_path = os.path.join(
            self.log_folder,
            f"screenshot_{screenshot_name}_{datetime.now().strftime('%H%M%S')}.png"
        )
        self.driver.save_screenshot(screenshot_path)
        self.log(f"  📷 Screenshot: {os.path.basename(screenshot_path)}")
        return screenshot_path

    # ---- Methods: fill_basic_info / fill_address / fill_contact_info /
    #      fill_password / accept_terms / click_next_button /
    #      click_confirm_button / navigate_to_register_page /
    #      signup_complete / login / logout / reset_password / close ----

# Usage Example
if __name__ == "__main__":
    user_data = {
        "last_name": "Yamada",
        "first_name": "Taro",
        "last_kana": "ヤマダ",
        "first_kana": "タロウ",
        "postal_code": "1500001",
        "address_detail": "1-1-1",
        "building": "Sample Building 101",
        "phone": "09012345678",
        "birth_year": "1990",
        "birth_month": "1",
        "birth_day": "1",
        "email": "test822211@example.com"
    }

    bot = YodobashiAutoSignup(headless=False)
    try:
        result = bot.signup_complete(user_data, password="hjerty12")
        print(f"Result: {result['message']}")
    finally:
        bot.close()
Method Breakdown
The class consists of 10+ methods, each with a clear, single responsibility. This makes it easy to debug individual steps, reuse logic, and extend the script for new use cases.
① __init__() — Class Initialization & ChromeDriver Setup
This method runs when the class is instantiated. It configures ChromeDriver options, sets up the log folder, and initializes WebDriverWait. Simply changing headless=False to True hides the browser window — making it ready for CI/CD environments right out of the box.
🔍 Key Point: The --disable-blink-features=AutomationControlled flag helps prevent the site from detecting Selenium as a bot. This is a practical technique when testing sites with bot-detection measures in place.
⚠ Note: Logs and screenshots are automatically saved to a yodobashi_signup_logs folder on the Desktop. Each run creates a new timestamped file, so execution history is never overwritten.
② log() / take_screenshot() — Logging & Evidence Collection
log() outputs timestamped messages to both the console and a text file simultaneously. take_screenshot() captures the current browser state as a PNG at any point in the flow. With both methods embedded at every step, you can trace exactly which step failed and why — using both visual screenshots and text logs.
💡 Real-world Tip: In QA work, “test evidence” is often required for sign-off. Automating screenshot collection dramatically reduces the time spent creating test reports. Combine with allure-pytest to generate polished HTML reports automatically.
③ fill_basic_info() — Name & Furigana Input
All input[type="text"] elements are fetched at once and identified by checking placeholder and name attributes. Rather than simply targeting “the first input on the page,” this attribute-based approach prevents breakage when form order changes.
⚠ Key Point: The condition 'kana' not in name_attr.lower() explicitly excludes kana fields to avoid accidentally entering kanji into the wrong field.
④ fill_address() — Postal Code Search & Address Input
Address input is a multi-step interaction: postal code search → candidate selection → street address input. The 7-digit postal code is split into first 3 and last 4 digits, entered into two separate inputs, then the “Search Address” button is found via XPath and clicked.
postal = user_data['postal_code']  # e.g. '1500001'
postal1 = postal[:3]   # '150'
postal2 = postal[3:]   # '0001'

# Extract inputs whose name attribute contains 'zip' or 'postal'
postal_inputs = []
for inp in self.driver.find_elements(By.XPATH, "//input[@type='text']"):
    name_attr = inp.get_attribute('name') or ''
    if 'zip' in name_attr.lower() or 'postal' in name_attr.lower():
        postal_inputs.append(inp)
🔍 Design Insight: Partial matching is more change-tolerant than exact ID matching — a key principle for robust test automation that survives site redesigns.
⑤ fill_contact_info() — Phone, Date of Birth & Email
Phone numbers are handled for both 11-digit and 10-digit formats, split into 3 parts. Birth month/day are <select> dropdowns — handled using the Select class with select_by_value().
💡 Tip: Always wrap select elements with Select(element). Calling click() directly on a select element won’t select the option — a common beginner mistake.
⑥ accept_terms() — Terms of Service Checkbox
The checkbox is located via its ID, then checked using a 3-tier fallback: normal click → JS click → direct JS property assignment. State is verified with is_selected() afterward.
💡 Tip: arguments[0].click() (fires a click event) and arguments[0].checked = true (sets the property directly) are different things. Having both covers virtually every scenario.
⑦ click_next_button() / click_confirm_button() — Screen Transition Buttons
Multiple XPath selectors are stored in an array and tried in order. Elements containing “Back” or “Cancel” are explicitly excluded.
⚠ Design Point: The prioritized fallback selector pattern — trying multiple locators in sequence — is a must-have technique for real-world Selenium automation.
⑧ login() / logout() — Login Verification & Cleanup
After registration, the script immediately performs logout → login, verifying not just that registration succeeded but that the account is fully functional end-to-end.
| Method | Element Location Strategy | Success Detection Logic |
|---|---|---|
login() |
Multiple selectors tried in order; hrefs containing “logout” excluded | Page body checked for greeting text after login |
logout() |
Username link clicked to open dropdown, then logout element searched | Returns True if logout element not found (assumed already logged out) |
⑨ reset_password() — Password Reset Flow
Automates the “Forgot your password?” flow — entering email, name, then submitting. Enables automated testing of the password reset feature for full login scenario coverage.
🔍 Key Point: logout() is called at the start to ensure logged-out state. Even if logout fails, execution continues — creating a state-independent, robust test flow.
Sample Execution Log
Running the script outputs logs like this to both the console and a text file in real time.
[2025-07-10 14:32:01] ======================================================================
[2025-07-10 14:32:01] Yodobashi Camera Member Registration Automation (Full Flow)
[2025-07-10 14:32:01] Password: hjerty12
[2025-07-10 14:32:02] [Step 1] Navigating to member registration page...
[2025-07-10 14:32:05]   ✓ Registration link clicked
[2025-07-10 14:32:08]   📷 Screenshot: screenshot_01_registration_page_143208.png
[2025-07-10 14:32:08] [Step 2] Filling in basic information...
[2025-07-10 14:32:09]   ✓ Last name: Yamada
[2025-07-10 14:32:09]   ✓ First name: Taro
[2025-07-10 14:32:10]   ✓ Last name (Kana): ヤマダ
[2025-07-10 14:32:10]   ✓ First name (Kana): タロウ
[2025-07-10 14:32:11] [Step 3] Filling in address information...
[2025-07-10 14:32:12]   ✓ Postal code: 150-0001
[2025-07-10 14:32:14]   ✓ Address search executed
[2025-07-10 14:32:15]   ✓ Street address: 1-1-1
[2025-07-10 14:32:16] [Step 5] Agreeing to terms...
[2025-07-10 14:32:18]   ✓ Agreed to terms (normal click)
[2025-07-10 14:32:18]   📷 Screenshot: screenshot_02_form_filled_143218.png
[2025-07-10 14:32:19] [Step 6] Proceeding to confirmation screen...
[2025-07-10 14:32:22]   ✓ Click successful
[2025-07-10 14:32:32] ✓ Member registration complete!
[2025-07-10 14:32:45]   ✓ Login successful!
[2025-07-10 14:32:50] Final result: Registration, logout, login, and logout all completed!
⚠️ Getting This Error?
======================================================================
Result: Password input failed
Email: test****@example.com
Password: ******
Log file: C:\Users\HP\Desktop\yodobashi_signup_logs\signup_log_****.txt
======================================================================
The most common cause of this error is using an email address that has already been registered.
- Change the
emailvalue to a different address (e.g.test_99999@example.com) and re-run - It’s a good practice to prepare several test email addresses in advance
- Attempting to register with a duplicate address triggers a “duplicate registration error” — the script cannot reach the password input step
Here’s what the actual terminal output looks like when the script runs in the author’s environment. Steps 1 through 3 execute in sequence, with each field confirmed by a ✓.
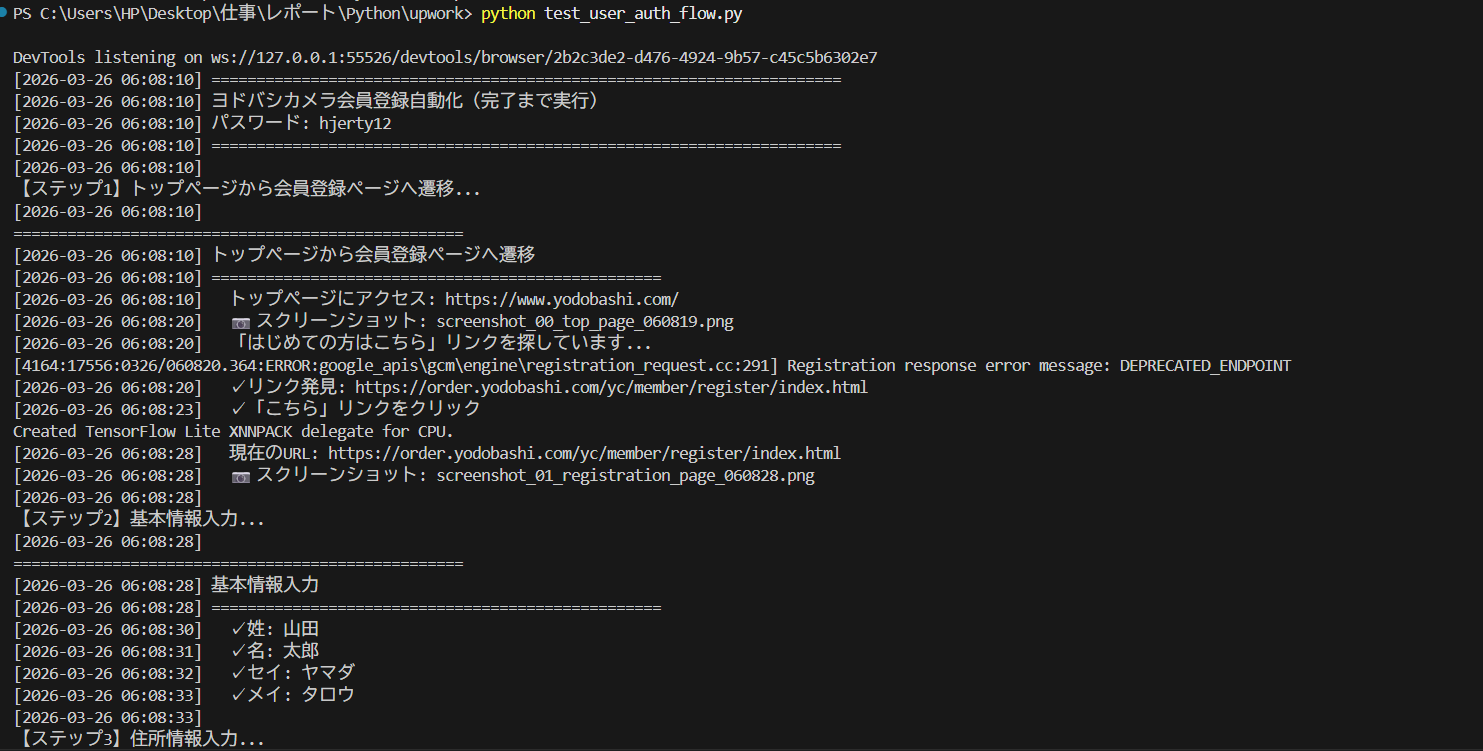
▲ Real terminal output — Step 1 (navigation) → Step 2 (basic info) → Step 3 (address) run in sequence with each field confirmed
Ideas for Taking It Further
🔄 Data-Driven Testing (DDT)
Load user_data from a CSV or Excel file to run bulk tests across multiple users. Combine with pandas.read_csv() for a clean, scalable approach.
⚡ Parallel Execution
Use concurrent.futures.ThreadPoolExecutor or pytest-xdist to run multiple account registrations simultaneously.
🛡️ Enhanced Retry Logic
Add automatic retry using the tenacity library to handle network delays and dynamic content loading.
📊 HTML Report Generation
Combine pytest + allure-pytest to automatically generate polished HTML test reports with screenshots.
Use Cases & Extensions
🚀 Where This Code Shines
🧪 Regression Testing
Automatically verify the registration flow before each release. Plug into CI/CD to run after every deployment.
📋 Acceptance Test Automation
Collect screenshot-based evidence automatically for stakeholder sign-off, cutting report creation time drastically.
🔧 E2E Test Learning Resource
Element location, waits, screenshots, logging — all the practical Selenium patterns you need in one script.
🔄 Password Reset Flow Testing
The reset_password() method covers the full “Forgot password” flow — complete login scenario coverage.
Applying This to Real Projects: POM × CI/CD
📐 Page Object Model (POM)
Split each page into its own class, separating interaction logic from test logic — the standard design pattern for maintainable Selenium automation.
pages/register_page.py  ← interaction logic
tests/test_register.py  ← test cases
⚙️ CI/CD Integration
Paired with GitHub Actions, the registration flow quality is automatically guaranteed on every deployment.
push → GitHub Actions triggered
→ pytest runs → report generated
Pitfalls & Lessons Learned
Here are the key issues I encountered during implementation. I hope this helps others who run into the same problems.
① Checkbox Does Not Respond to a Normal Click
Executing click() on the terms checkbox sometimes failed to check it. The cause was that the checkbox itself was hidden with visibility:hidden, and the site was designed to click the label element instead.
# ❌ Normal click may not work
checkbox = driver.find_element(By.ID, "js_i_checkPrivacyPolicyAgreement")
checkbox.click()

# ✅ Solved with a 3-step fallback: click → JS click → direct property change
try:
    checkbox.click()
except:
    driver.execute_script("arguments[0].click();", checkbox)
    if not checkbox.is_selected():
        driver.execute_script("arguments[0].checked = true;", checkbox)
💡 Key Takeaway: arguments[0].click() (firing a click event) and arguments[0].checked = true (directly changing the property) are different. Having both in your toolkit covers nearly every scenario.
② Dropdown (select tag) Cannot Be Selected with a Direct Click
The birth month and day fields were dropdowns, and a regular click() could not select values. I got stuck because I didn’t know that the Select class is required for this.
# ❌ Direct click cannot select a value
month_element.click()

# ✅ Wrap with Select class and operate
from selenium.webdriver.support.ui import Select
select = Select(month_element)
select.select_by_value("1")  # Select January
💡 Key Takeaway: Always use the Select class for <select> tags. Don’t forget to import it.
③ A Single XPath Pattern for Buttons Breaks Easily
I specified the “Next” button with a single XPath pattern, and a minor site change caused it to no longer be found. Button text often has multiple variations such as “Next”, “Proceed”, or “Continue”, so a single pattern is insufficient.
# ❌ A single pattern breaks easily
button = driver.find_element(By.XPATH, "//button[text()='Next']")

# ✅ Fallback design: try multiple patterns in order
selectors = [
    "//button[contains(text(),'Next')]",
    "//input[@type='submit']",
    "//a[contains(text(),'Next')]",
]
for selector in selectors:
    elements = driver.find_elements(By.XPATH, selector)
    if elements:
        elements[0].click()
        break
💡 Key Takeaway: A fallback design that tries multiple selectors in priority order is a best practice for real-world Selenium tests.
④ Locating the Postal Code Field Was Tricky
I was directly specifying the postal code field by id, but a site redesign changed the id and broke the test. I learned that partial matching is more resilient to changes than exact matching.
# ❌ Exact id match is fragile
driver.find_element(By.ID, "zipCode1")

# ✅ Flexible partial match on name attribute
for inp in driver.find_elements(By.XPATH, "//input[@type='text']"):
    name_attr = inp.get_attribute('name') or ''
    if 'zip' in name_attr.lower() or 'postal' in name_attr.lower():
        postal_inputs.append(inp)
💡 Key Takeaway: Partial attribute matching is more resilient to site changes than exact ID or class name matching, reducing long-term maintenance costs.
⑤ Verifying Login Success Was Difficult
I struggled to determine whether login was successful. In some cases the URL didn’t change after login, meaning URL or page title alone wasn’t enough to verify success.
# ❌ URL alone may not be sufficient
if "mypage" in driver.current_url:
    print("Login successful")

# ✅ Verify by checking text in the page body
body_text = driver.find_element(By.TAG_NAME, "body").text
if "Hello" in body_text or "Welcome" in body_text:
    print("Login successful")
⚠️ Note: The text used for verification varies by site. Always check the actual post-login page to identify text that is reliably present.
Summary
In this article, we walked through a script that fully automates the Yodobashi Camera member registration flow using Python × Selenium.
After the script completes, the yodobashi_signup_logs folder on your Desktop contains a log file and timestamped screenshots saved automatically — ready to use as test evidence right away.
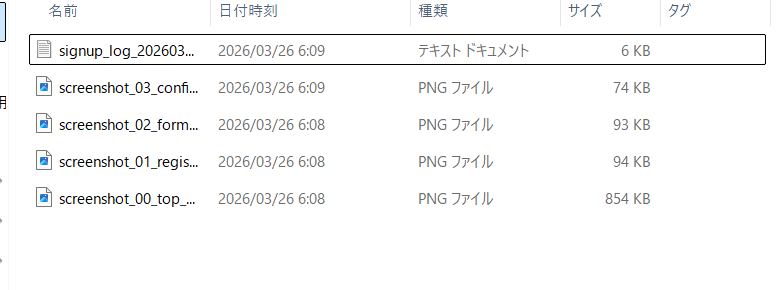
▲ Auto-saved log folder contents — log file + 4 screenshots organized with timestamps, ready to use as test evidence
| Multi-selector fallback design | Multiple XPath patterns tried in sequence for robust element targeting |
| Log + Screenshot | Full execution history captured — reduces debugging and reporting effort |
| Registration → Logout → Login flow | Verifies not just registration, but that the account is fully usable |
| Class-based design for reusability | Each feature is an independent method — easy to extend and customize |
This script was designed with the goal of reaching production-ready automation quality — not just a quick prototype, but something you can actually use and build on in real QA work. Check out the full source code on GitHub and customize it to fit your own project!