📌 This article is for:
- Engineers who want to start API testing with Playwright’s APIRequestContext
- Developers interested in automating authentication flows (token acquisition, passing, and rejection)
- QA engineers who want to manage test data efficiently with pytest fixtures
- Anyone who wants to automate CRUD operations (POST, PUT, DELETE) against a REST API
✅ What you’ll learn in this article
- How to implement API tests using Playwright’s APIRequestContext
- How to manage and share auth tokens across tests using pytest fixtures
- Test implementations for GET / POST / PUT / DELETE HTTP methods
- How to verify that unauthenticated access is correctly rejected
When it comes to API testing in Python, the requests library + pytest combination is well-known — but Playwright also ships with a powerful API testing feature called APIRequestContext.
In this article, we’ll use the practice hotel booking API Restful Booker to implement a complete authentication flow — login → token acquisition → authenticated requests — across 6 test cases.
Target API & Test Structure
API Overview
| Item | Details |
|---|---|
| Target | Restful Booker (hotel booking practice API) |
| BASE URL | restful-booker.herokuapp.com |
| Framework | Playwright (Python) + pytest |
| Auth Method | Token auth via Cookie header (Cookie: token=xxx) |
6 Test Cases
| TC | HTTP Method | Description | Expected Status |
|---|---|---|---|
| TC01 | POST /auth | Successful login → token acquired | 200 |
| TC02 | POST /auth | Failed login (wrong password) → error confirmed | 200 + reason |
| TC03 | POST /booking | Create booking with token | 200 |
| TC04 | PUT /booking/{id} | Update booking with token | 200 |
| TC05 | DELETE /booking/{id} | Delete booking with token | 201 |
| TC06 | DELETE /booking/{id} | Delete without token → rejection confirmed | 403 |
Environment Setup
Install Required Packages
# Install Playwright + pytest
pip install playwright pytest pytest-playwright pytest-html

# Install Playwright browsers (optional for API-only tests)
playwright installplaywright install can be skipped — but it’s recommended if you plan to combine API and E2E tests later.pytest.ini: Auto-generate HTML Reports
Place a pytest.ini file at the project root to automatically generate an HTML report every time tests run. This makes it easy to review results in a browser and keep them as evidence.
▼ Folder Structure
project/
├── pytest.ini          # ← place here
├── test_auth_flow.py
└── report.html         # ← auto-generated after each run
▼ pytest.ini contents
[pytest]
addopts = --html=report.html --self-contained-html
▼ What each option does
| Option | Meaning |
|---|---|
--html=report.html | Generate an HTML report named report.html |
--self-contained-html | Embed CSS and assets inline — one file, easy to share |
# With pytest.ini in place, no extra flags needed — report generates automatically
pytest test_auth_flow.py -v -s--html=report.html every time. Settings are shared consistently across the whole team.If report.html doesn’t display correctly
Opening report.html by double-clicking it may cause styling issues or blank content due to browser security restrictions (CORS). In that case, use Python’s built-in HTTP server to serve it locally.
▼ Steps
| STEP | Action |
| 1 | Open a terminal in the folder containing report.html |
| 2 | Run the command below to start a local server |
| 3 | Open localhost:8080/report.html in your browser (type directly into the address bar) |
# STEP 2: Start a local server in the folder with report.html
python -m http.server 8080

# You'll see: Serving HTTP on 0.0.0.0 port 8080 ...
# STEP 3: Open this in your browser (type directly into address bar)
localhost:8080/report.htmlprint() output (when using -s flag)Ctrl + C in the terminal. python -m http.server is built into Python — no extra installation needed.Playwright API Testing: 4 Core Patterns
Before diving into the test code, here are the 4 essential patterns you need to understand for API testing with Playwright.
① APIRequestContext: Creating the HTTP Client
To send API requests with Playwright, first create an APIRequestContext. By specifying a base_url, you can use just the path in subsequent requests.
# Create APIRequestContext with a base_url
request_context = playwright.request.new_context(
    base_url="https://restful-booker.herokuapp.com"
)

# Now you can use just the path for requests
response = request_context.get("/booking")
② Token Acquisition: POST to the Auth Endpoint
Send a POST request to the auth endpoint and extract the token from the JSON response.
response = request_context.post(
    "/auth",
    data={"username": "admin", "password": "password123"}
)

# Extract the token from the response JSON
token = response.json()["token"]
print(token)  # → "abc123xyz..."
③ Passing the Token: Cookie vs Bearer
How you pass the token to the API depends on the API’s specification. Restful Booker uses the Cookie method. Most modern REST APIs use Bearer — knowing both makes your skills transferable to any API.
| Method | Header | Common Use |
|---|---|---|
| Cookie ← used here | "Cookie": f"token={token}" | Restful Booker and some legacy APIs |
| Bearer | "Authorization": f"Bearer {token}" | JWT auth and most modern REST APIs |
# ✅ Cookie method (used in this article — Restful Booker)
headers = {"Cookie": f"token={token}"}

# Bearer method (common in most modern REST APIs)
# headers = {"Authorization": f"Bearer {token}"}403 Forbidden response.④ Running the Test: Send Request and Verify
Once the headers are set up, send the request and verify both the status code and the response body.
# GET request with auth header
response = request_context.get(
    "/booking/1",
    headers={"Cookie": f"token={token}"}
)

# Verify status code
assert response.status == 200, f"Expected 200 but got {response.status}"

# Verify response body
body = response.json()
assert body["firstname"] == "Taro", "firstname does not match expected value"Fixture Design: Managing Tokens and Booking IDs Efficiently
This test suite uses a 3-layer pytest fixture structure. Sharing the auth token and booking ID across the session eliminates the overhead of re-authenticating for each test.
▼ Fixture Dependency Chain
| api_request_context One instance per session | → | auth_token Fetched once, shared across all tests | → | booking_id Created in TC03 → used in TC04/05 |
Fixture ①: APIRequestContext
@pytest.fixture(scope="session")
def api_request_context(playwright: Playwright) -> APIRequestContext:
    context = playwright.request.new_context(base_url=BASE_URL)
    yield context
context.dispose() # Automatically releases resources after all testsscope="session" reuses a single context across the entire test session — no reconnection overhead per test.Fixture ②: Auth Token
@pytest.fixture(scope="session")
def auth_token(api_request_context: APIRequestContext) -> str:
    response = api_request_context.post(
        "/auth",
        data={"username": USERNAME, "password": PASSWORD},
    )
    assert response.status == 200, "Failed to acquire token"
    token = response.json().get("token")
    assert token, "Response does not contain a token"
return tokenFixture ③: Booking ID
@pytest.fixture(scope="session")
def booking_id(api_request_context: APIRequestContext, auth_token: str) -> int:
    response = api_request_context.post(
        "/booking",
        headers={"Content-Type": "application/json", "Accept": "application/json"},
        data="""{
            "firstname": "Taro",
            "lastname": "Yamada",
            "totalprice": 12000,
            "depositpaid": true,
            "bookingdates": {
                "checkin": "2025-01-01",
                "checkout": "2025-01-05"
            },
            "additionalneeds": "Breakfast"
        }""",
    )
    assert response.status == 200
    booking_id = response.json().get("bookingid")
    assert booking_id, "Failed to retrieve booking ID"
return booking_idFull Test Code
TC01: Successful Login → Token Acquired
def test_tc01_login_success(api_request_context: APIRequestContext):
    """TC01: Token is acquired with valid credentials"""
    response = api_request_context.post(
        "/auth",
        data={"username": USERNAME, "password": PASSWORD},
    )

    assert response.status == 200, f"Expected 200 but got: {response.status}"

    body = response.json()
    assert "token" in body, "Response does not contain a token"
    assert len(body["token"]) > 0, "Token is empty"

print(f"\n✅ TC01 PASS | Token acquired: {body['token']}")token key exists in response / Token is not emptyTC02: Failed Login (Wrong Password)
def test_tc02_login_failure(api_request_context: APIRequestContext):
    """TC02: No token is issued with incorrect credentials"""
    response = api_request_context.post(
        "/auth",
        data={"username": USERNAME, "password": "wrongpassword"},
    )

    assert response.status == 200, f"Expected 200 but got: {response.status}"

    body = response.json()
    assert "token" not in body, "Token was returned despite wrong password"
    assert body.get("reason") == "Bad credentials", (
        f"Unexpected error message: {body.get('reason')}"
    )

print(f"\n✅ TC02 PASS | Auth failure correctly detected: {body}")reason: "Bad credentials". Real-world APIs typically return 401 — always check the API spec.TC03: Create Booking with Token (POST)
def test_tc03_create_booking_with_token(
    api_request_context: APIRequestContext, auth_token: str, booking_id: int
):
    """TC03: A booking can be created with a valid auth token"""
    assert booking_id > 0, "Booking ID is invalid"

print(f"\n✅ TC03 PASS | Booking created (BookingID: {booking_id})")booking_id fixture. TC03 simply confirms the fixture ran successfully — keeping the test itself minimal and clean.TC04: Update Booking with Token (PUT)
def test_tc04_update_booking_with_token(
    api_request_context: APIRequestContext, auth_token: str, booking_id: int
):
    """TC04: A booking can be updated with a valid auth token"""
    response = api_request_context.put(
        f"/booking/{booking_id}",
        headers={
            "Content-Type": "application/json",
            "Accept": "application/json",
            "Cookie": f"token={auth_token}",  # Pass token via Cookie header
        },
        data="""{
            "firstname": "Hanako",
            "lastname": "Yamada",
            "totalprice": 15000,
            "depositpaid": false,
            "bookingdates": {
                "checkin": "2025-02-01",
                "checkout": "2025-02-07"
            },
            "additionalneeds": "Dinner"
        }""",
    )

    assert response.status == 200, f"Update failed: {response.status}"

    body = response.json()
    assert body.get("firstname") == "Hanako", "firstname was not updated"
    assert body.get("totalprice") == 15000, "totalprice was not updated"

print(f"\n✅ TC04 PASS | Booking updated: {body}")TC05: Delete Booking with Token (DELETE)
def test_tc05_delete_booking_with_token(
    api_request_context: APIRequestContext, auth_token: str, booking_id: int
):
    """TC05: A booking can be deleted with a valid auth token"""
    response = api_request_context.delete(
        f"/booking/{booking_id}",
        headers={"Cookie": f"token={auth_token}"},
    )

    assert response.status == 201, f"Delete failed: {response.status}"

print(f"\n✅ TC05 PASS | Booking deleted (BookingID: {booking_id})")TC06: Access Protected Endpoint Without Token (Rejection Check)
def test_tc06_delete_booking_without_token(
    api_request_context: APIRequestContext, booking_id: int
):
    """TC06: A DELETE request without a token is rejected"""
    # The booking was deleted in TC05 — reuse the same ID to confirm auth rejection
    response = api_request_context.delete(
        f"/booking/{booking_id}",
        headers={},  # No Cookie — no auth
    )

    assert response.status == 403, (
        f"Delete succeeded without a token: {response.status}"
    )

print(f"\n✅ TC06 PASS | Unauthenticated access correctly rejected: status={response.status}")How to Run & Execution Results
Running the Tests
# Standard run
pytest test_auth_flow.py -v

# Include print() output
pytest test_auth_flow.py -v -s
Terminal Output
All 6 tests PASSED in 5.07 seconds.
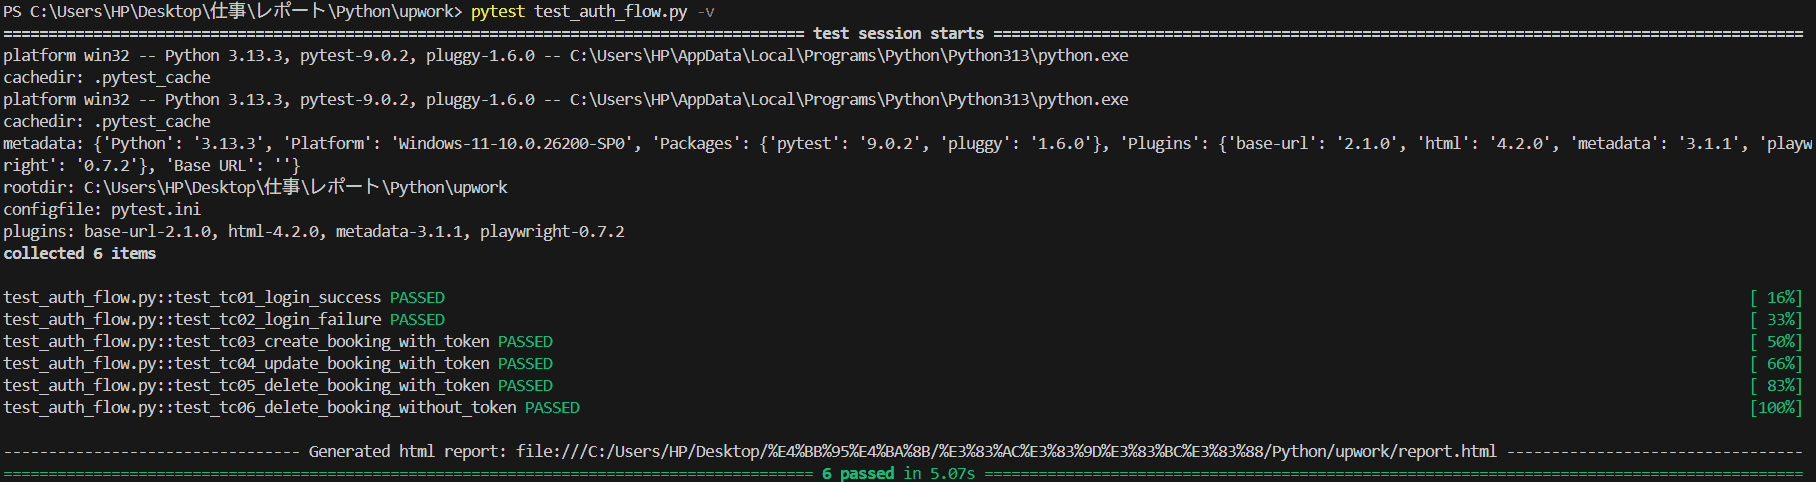
▲ Terminal output — TC01 through TC06 all PASSED
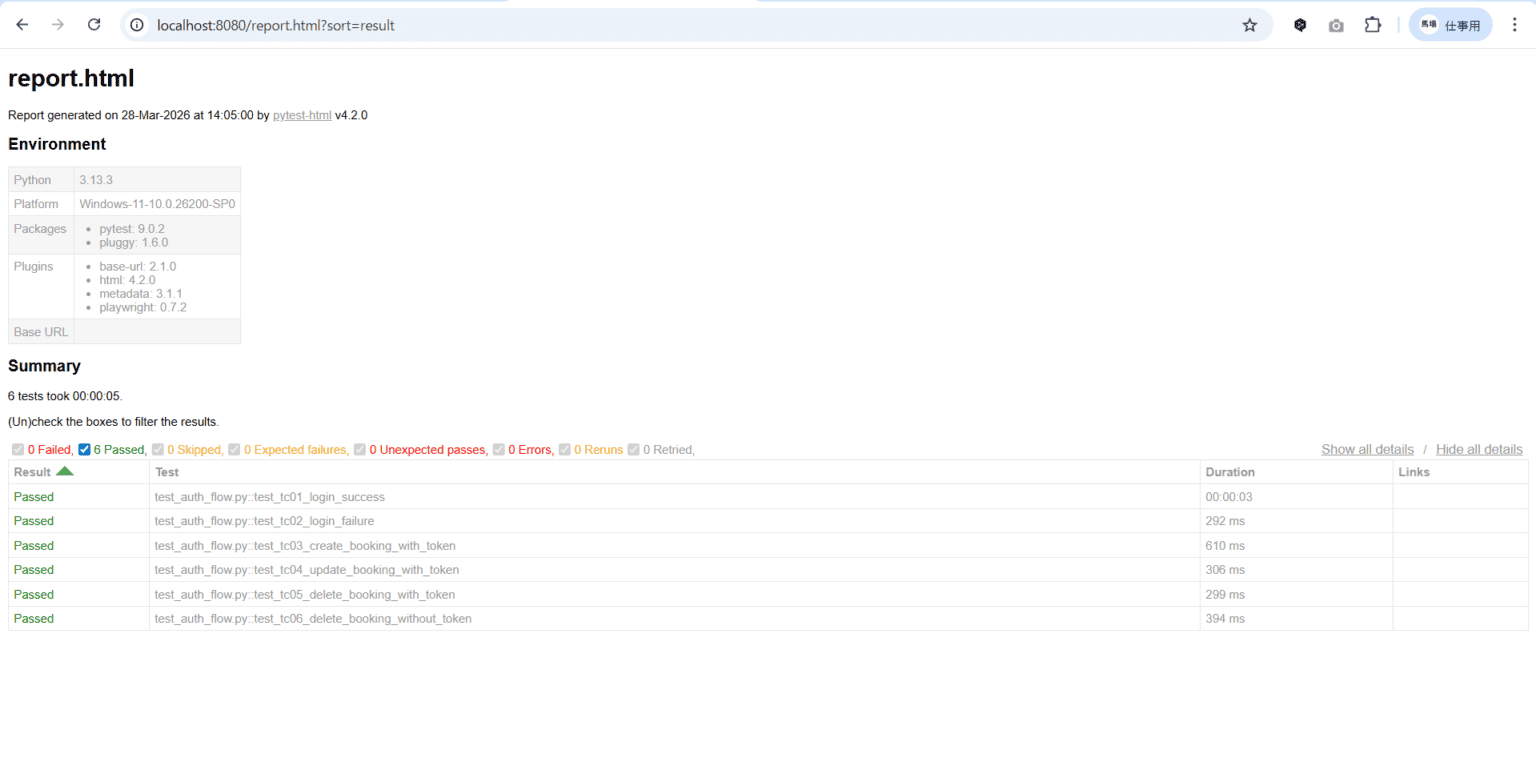
HTML Report (report.html)
The report.html auto-generated by pytest.ini — showing test names, duration, and PASS/FAIL at a glance.

▲ report.html — 0 Failed / 6 Passed / total 5 seconds
Design Highlights: Why This Structure
One login per session instead of re-authenticating per test. DRY principle in action.
booking_id depends on auth_token — prerequisites are automatically guaranteed.
TC06 verifies rejection — automating security alongside functional tests.
APIRequestContext skips the browser entirely — 6 tests complete in around 5 seconds.
📖 Related Articles
Summary
In this article, we implemented a complete authentication flow across 6 test cases using Playwright’s APIRequestContext and pytest.
📋 Key Takeaways
- Playwright’s APIRequestContext enables fast, browser-free API tests
- Auth tokens managed with
scope="session"fixtures are shared across all tests efficiently - POST, PUT, and DELETE HTTP method patterns are now in your toolkit
- Both negative (wrong password) and security (no-token rejection) test cases can be automated
- API status codes vary by implementation — always verify against the API spec before writing assertions
Playwright handles both E2E and API testing in one framework. Unifying your test stack means less context-switching and more time writing tests that matter.